
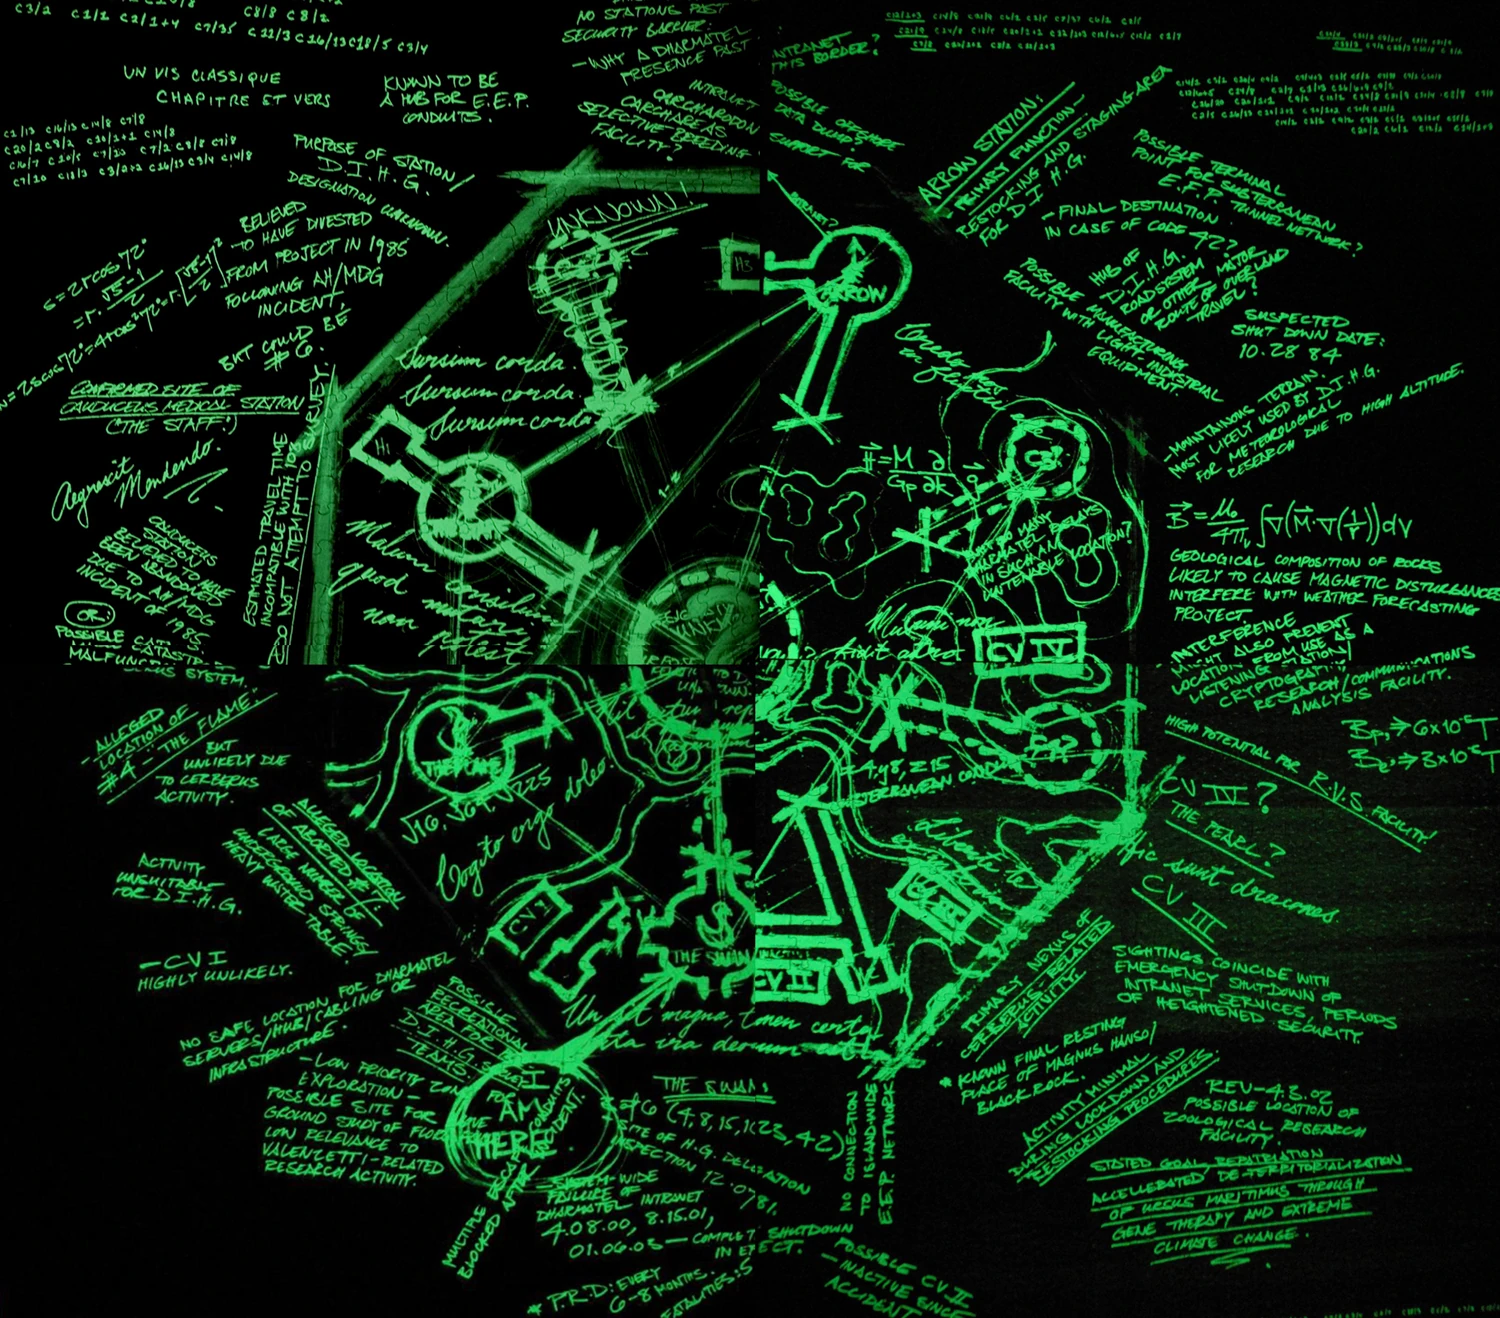
A full picture of the blast door map

The blast door with legible text written above
The blast door map was a map of DHARMA Initiative facilities on the Island drawn in UV paint along with accompanying annotations on a blast door in the Swan station. It was only visible during lockdown. It was destroyed in the discharge.
Creation[]
Former Swan inhabitant Radzinsky started the map, adding to it during the only time the blast door was engaged, during lockdowns. He and Swan partner Kelvin Joe Inman regularly tricked the system into initiating lockdowns in order to paint the map, which was only visible under blacklight. Template:Crossref Following the death of Radzinsky, Kelvin continued the map, although at a much slower pace. He told Desmond that he did not possess the photographic memory of Radzinsky, which allowed him to remember exactly where he left off.
When the fake lockdowns were initiated, no black light began shining, which forced the map's creators to work blindly. Laundry detergent was at least one of the substances used as "ink" for the map. Other substances might have been used, as indicated by the different colors on the map. It is not known whether Desmond actually contributed to the map himself.
Locke saw the blast door map for the first time in episode 第2季 第17集 while trapped under the blast door in during a lockdown. Black lights switched on, revealing the map and its contents.
There were at least two types of notations on the map: printed notes in English, informed and factual; and more speculative Latin-language philosophical musings in cursive.
[]
Locations and geography[]

The written notations
The hidden map shows the location of six stations (with a seventh crossed out), which are all "pointing" to the center of the Island, represented on the map by a large question mark. Four of the bunkers have both graphics and text identifiers, apparently their respective names and logos; the two remaining have no titles, and are marked with "C3?" and "C4?". The stations listed on the hidden map are, counter-clockwise: the Arrow, the crossed out station, the Staff, the Flame, the Swan, "C3?" and "C4?". The central location, indicated by the question mark is the Pearl.
In the Access: Granted on the Blu-Ray DVD, the pearl was confirmed to be the Question mark on the blast door map.
In the March 10'th Podcast, the Tempest was confirmed to be on the blast door map.
Accuracy[]
The accuracy of some details of the map can be questioned. While the Swan, Pearl and Staff were within reasonably close distance of the beach camp of the survivors, reaching the Flame required two days walk. The Arrow was a similar distance away.
Notations[]
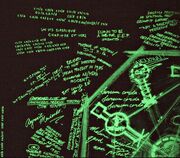
Another website spent some time deciphering the text on the door and making it clear and easy to read by placing text over the door text, in this picture.
There are numerous handwritten notations on the blast door map. They are written in several scripts, suggesting multiple contributors. The notes can be grouped into four general categories, English commentary, Latin commentary, mathematical equations, and single object labels (the Swan, the Flame, CVIII, etc). The Latin phrases appear to be more of a running commentary than insightful notations about the map. By contrast, the majority of the notations written in English address the various stations, a cryptic incident, possible shutdowns, a Cerberus system, a DharmaTel network, scientific equations, Cerberus vent locations (abbreviated as 'CV' on the map) and zoological research. In the top right and left corners, notations like c1/1 can be seen. They are many in number, and appear to reference other stations (CV/3 is an example.)
Math, equations, science[]


Enhanced close-up of date
Found on the blast door map are several equations, both mathematical and scientific, written as additional notations to the diagram. Three trigonometric equations are located in the top left-hand corner of the blast door map, two calculus problems appear to be engineering/physics equations related to magnetism, two derived values are found at the far right of the map, and other various mathematical equations are spread throughout it. Some of these equations are similar to Rousseau's equations.
Swan Details[]
As the map was drawn in the Swan, much detail was given to it. For instance, there appear to be two tunnels attached to the Swan. However, one of these tunnels has been broken off, indicating the sealed area around the electromagnet lab.
Timeline[]
There are several notations on the hidden map that appear to be dates, which use a month/day/year format. Some appear to indicate a "shutdown" occurred. What was shut down and why it was shutdown are unknown. There is another date reference to a zoological research facility and a reference to something called an AH/MDG incident of 1985.
The Crossed-out Station[]

The Crossed-out Station as seen on the glow-in-dark jigsaw map
Between The Staff and The Arrow stations, there is a station marked as "C1?" which has been crossed out and the comment "UNKNOWN!" added above it. This station is drawn in the same dashed line style as the other two currently unconfirmed stations.
Locke's map[]


During the Lockdown incident, while being trapped under one of the blast doors, Locke saw the blast door map for the first time. He later tried to recreate the map on paper by drawing what he remembered. Locke only had a few seconds to look at the blast door map though, so his memories of the details were rather patchy. He appeared to recall the station locations, the 'rivers' and the "?" in the middle the best. After various attempts, particularly in 第2季 第19集 , Locke finally drew a good copy, which was seen in 第2季 第21集 , when he was handing it to Mr. Eko.
"
Via Domus version of the blast door map[]

|
不認可內容 警告! 這個頁面/段落雖然含有官方發表的資訊,但是對整套劇集來說並不認可 |
|

The newer version of the blast door map, as seen in a trailer for Lost: Via Domus.
Unanswered questions[]
| 未解決的謎題 |
|---|
更多...
|
- 如對以下的未解決謎題有任何推論,請到理論頁面去討論
- Why did Radzinsky make a hidden map?
- Why is one station crossed out, and why are others drawn in dotted lines?
- What is the crossed out writing above the Arrow Station?
- What does the station marked "unknown" do?
- Why are parts of the stations (which appear to be corridors sides of rooms) terminated with X symbols?
- Why is the "C3" location "untenable", according to the map?
- Where is the Tempest on the map?
Other official high-resolution images of the map[]

Images of the glow-in-the-dark backs of all 4 jigsaw puzzles, pieced together
In addition to the screen capture of the map from 第2季 第17集 , the original map has been presented through other official venues. These images were apparently taken from the original prop source, and thus are higher quality images, some of which show more details and sections of the map than those from the episode itself. These include:
- High-res image in Entertainment Weekly the day after the original airing of 第2季 第17集
- Image from the Season 2 DVD special, "Secrets from the Hatch"
- Glow-in-the-dark images on the backs of the Official Jigsaw Puzzles
- High-res 11x17 pull out poster in Lost: The Official Magazine: Volume 1, Issue 10